In the vast landscape of vintage computing, few machines evoke the nostalgia and reverence of the Commodore 64. Introduced in 1982, the C64 captured the hearts and minds of millions with its affordability, versatility, and extensive software library. While its glory days may seem like a distant memory, enthusiasts continue to discover new ways to harness its power-even in the modern era.
One such fascinating application is using the Commodore 64 as a terminal for a DOS (Disk Operating System) computer. In this blog post, we'll delve into the intricacies of this setup, exploring its history, practical applications, and the steps involved in configuring your C64 as a DOS terminal.
A brief history of terminals:
In the early days of computing, terminals served as the primary interface between users and mainframe or minicomputer systems. These devices facilitated communication with the central computing unit, allowing users to enter commands and receive feedback. While modern computing has largely moved away from traditional terminals in favor of graphical user interfaces (GUIs), the concept remains relevant in niche applications and retro computing circles.
Why use a Commodore 64 as a terminal?
The idea of repurposing the Commodore 64 as a terminal for a DOS computer may seem unconventional, but it offers several compelling advantages. First, it breathes new life into an iconic piece of computing history, allowing enthusiasts to relive the golden age of computing through a modern lens. Second, it showcases the versatility of the C64, demonstrating its ability to interface with contemporary systems despite its age. Finally, it provides a unique and nostalgic computing experience that appeals to retro enthusiasts and hobbyists alike.
Practical applications:
But beyond the novelty factor, what are the practical applications of using a C64 as a DOS terminal? Surprisingly, quite a few. For starters, it allows users to access and interact with DOS-based software and applications from the comfort of their beloved Commodore machine. This can be especially useful for enthusiasts who want to explore vintage software or run legacy DOS games on their C64.
In addition, using the C64 as a terminal opens up possibilities for remote computing and data transfer. By establishing a connection between the C64 and a DOS computer, users can transfer files, execute commands, and even control the DOS system remotely - all from the familiar interface of their Commodore machine. This can be invaluable for tasks such as data backup, software development, or accessing resources on a remote DOS system.
Imagine this: You connect a cable between your C64 or C128 and your PC, fire up Novaterm on your Commodore machine, boot your PC, and voila! You're now navigating MS-DOS from the familiar interface of your beloved C64. It's a nostalgic twist on modern computing.
Today, however, the Commodore community is somewhat deprived of modern software. We lack the popular compilers, archiving programs, and productivity tools that are commonplace in modern computing environments. But this lack shouldn't discourage us. There are workarounds and alternatives we can explore until we get the software we want.
Consider this scenario: You download a file compressed with pkzip2.04, but unfortunately you lack the necessary software to unpack it on your Commodore system. Fear not! Using the method outlined below, you can seamlessly transfer the file to your PC, unzip it there, and transfer its contents back to your Commodore drive, all without leaving your terminal program. Similarly, you could develop Fortran programs on your PC, review them, and then send them to your university's supercomputer for execution. The possibilities are fascinating, and with operating systems like LUnix, there's even more potential waiting to be tapped.
So let this be an invitation to dust off your C64 and rediscover its capabilities. All you have to do is make the cable described, connect it to a simple RS232 interface of your Commodore and one of the serial ports of your PC, and create a boot disk to initiate this setup to remote access a PC. It's remarkably simple. And if you do not have an RS232 interface, do not worry - I can provide you with a simple and inexpensive schematic upon request.
For those without a PC, rest assured that getting a basic setup shouldn't break the bank. An old PC paired with a 1.44MB floppy drive is all you need. You don't need fancy peripherals like a video card or a keyboard-the machine itself, an I/O card, and a storage device are all you need to remote access a PC.
In conclusion, while the C64 era may seem like a bygone era, it still holds untapped potential, especially when integrated with modern computing paradigms. With a little ingenuity and resourcefulness, you can breathe new life into your beloved Commodore machine and embark on a journey of exploration and innovation in the digital realm.
Configuring Your C64 as a DOS Terminal:
Now let's look at the practicalities of setting up your Commodore 64 as a terminal for a DOS computer. While the process may seem daunting at first, it's surprisingly easy with the right tools and guidance.
Hardware Requirements: To establish a connection between your C64 and a DOS computer, you'll need a few key components: a serial cable to connect the two machines, a terminal emulation program for the C64, and appropriate software on the DOS computer to facilitate communication.
Terminal emulation software: Several terminal emulation programs are available for the Commodore 64, each with its own set of features and capabilities. Popular options include Novaterm, CCGMS, Striketerm, and Desterm (for C128). Choose the one that best suits your needs and download it to your C64.
Set up the connection: Once you have the necessary hardware and software in place, it's time to establish a connection between your C64 and the DOS computer. Connect one end of a serial cable to the RS-232 port on your C64 and the other end to a serial port on the DOS computer.
Configure Terminal Settings: Start the terminal emulation program on your C64 and configure the settings to match those of the DOS computer. This typically involves setting the baud rate, data bits, parity, and stop bits to ensure proper communication between the two systems.
Test the connection: With the connection established and the terminal settings configured, it's time to test the setup. Send a command from the C64 to the DOS computer and see if it executes correctly. Also, try to transfer a file from one system to the other to ensure that the data exchange is seamless.
Explore Remote Computing: Once you've verified that the connection works as intended, take advantage of the remote computing capabilities of your C64 terminal. Experiment with running DOS commands, accessing files and directories, and even controlling software running on the DOS computer-all from the comfort of your Commodore machine.
Making A Boot Disk to Remote Access a PC
Create the boot disk first:
Assuming you don't have a hard drive or don't want to change your configuration, follow these steps to create a boot disk:
With a complete PC and a blank floppy disk in drive A:, type the following command in DOS
sys a:
Allow the command to complete. This will copy the system files to the floppy, making it bootable.
Use a text editor to prepare a config.sys file:
Run the editor:
edit a:config.sys
Write the following lines:
files=30
buffer=20.4
Then save the file.
Using the editor again, prepare an autoexec.bat file:
Run the editor program:
edit a:autoexec.bat
Add these lines (assuming you only have 640K)
prompt=$p$g
smartdrv a 128
doskey
path=a:\;
mode com1: 24,n,8,1
ctty com1
echo hello world
Save the file and exit.
Verify the presence of 'command.com', 'config.sys' and 'autoexec.bat' by issuing a 'dir a:' command.
Copy the necessary files to your boot disk, assuming you have a 'c:\dos' directory:
copy c:\dos\smartdrv.exe a:
copy c:\dos\doskey.com a:
copy c:\dos\mode.com a:
Your boot disk is now configured for use with the PC via the COM-1 port at 2400 bps, no parity, 8 data bits, and 1 stop bit. You can adjust the settings by changing 'com1' to 'com2' for the second serial port and changing the baud rates accordingly (e.g. '24' for 2400bps, '30' for 300bps, etc.).
Transfer files between C64 and DOS PC
For X/Y/Z modem transfer programs, consider downloading one from the Simtel MS-DOS archive. For example, 'dsz??.zip' is a recommended shareware package. There are also options for the Punter protocol. Once installed (or 'unzipped'), your PC and C64 can seamlessly transfer data using the included cable.
If you have trouble finding or running the files, please let me know and I can provide you with the exact FTP addresses or instructions on how to use them.
This setup opens the door to a wealth of software options. Feel free to download and install programs as needed.
If you want to use your PC keyboard with this setup, type the following commands
mode lpt1=com1
type con > com1
The first command sends the text screen (as opposed to the terminal screen) to the terminal using the print screen key. The second command sends whatever you type on your PC keyboard to your CBM after you press Enter. Press the Control-Break key to quit.
Your boot disk should now be ready. Please let me know if you encounter any difficulties.
Necessary Terminal Connections for a Vintage Computer
Below I've included schematics for the cable to remote access a PC, which offers two types of connections, one of which is easier.
Version 1:
part list:
. 3-wired shielded cable (less than 15 meters)
. two DB-25 connectors. (or two DB-9 connectors) Female type.
. some connection wires.
For 25-pin Serial Connectors:
  DB-25   to   DB-25
  =====        =====
    2------------3
    3------------2
    7------------7
  4-5-8        4-5-8
  6--20        6--20
* 4,5,8 are connected to each other for each DB-25 connector.
* 6,20 are connected to each other for each DB-25 connector.
For 9-pin Serial Connectors:
  DB-9    to   DB-9
  =====        =====
    3------------2
    2------------3
    5------------5
  7-8-1        7-8-1
   6-4          6-4
* 7,8,1 are connected to each other for each DB-9 connector.
* 6,4 are connected to each other for each DB-9 connector.
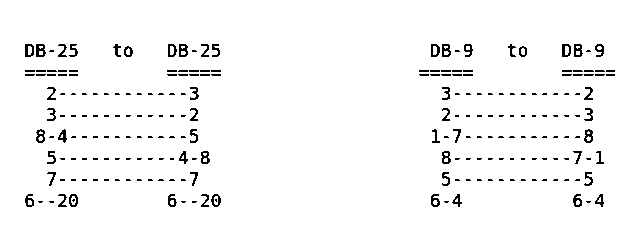
Version 2: (use this for 9600bps or higher with rts/cts flow control)
part list:
. 5-wired shielded cable (less than 15meters)
. two DB25 connectors ( or two DB9 connectors) Female type.
. some wires
   DB-25   to   DB-25
   =====        =====
     2------------3
     3------------2
    8-4-----------5
     5-----------4-8
     7------------7
   6--20        6--20
* 8,4 are connected to each other for each DB-25 connector.
* 6,20 are connected to each other for each DB-25 connector.
  DB-9    to   DB-9
  =====        =====
    3------------2
    2------------3
   1-7-----------8
    8-----------7-1
    5------------5
   6-4          6-4
* 7,1 are connected to each other for each DB-9 connector.
* 6,4 are connected to each other for each DB-9 connector.
Note that, the numbers of the pins are written on the connector.
To use both modem and this cable, you need to find or build a connector, which accepts two serial connection and directs them to your interface.
That is:
   DB9-male     DB9-male     DB9-female
   ==========   ==========   ==========
       1------------1-----------1
       2------------2-----------2
       .            .           .
       .        all wires       .
       .            .           .
       9------------9-----------9
Or with DB25 connectors, if you built DB25 type cables.
With this interface connector, you can connect the modem cable to one of the DB male connectors, the PC cable to the other DB male connector, and the DB female connector to the DB male connector of your RS232 interface.
If you open only one of the devices (PC or modem) at a time, data collision can be avoided.
I think this information should be sufficient to remote access a PC using your beloved Commodore. If you have any questions or problems with this document, please feel free to email me (see About Us section for the email address).
Concluding remarks for using C64 to remote access a PC
In conclusion, repurposing the Commodore 64 as a terminal for a DOS computer offers a fascinating glimpse into the intersection of retro computing and modern technology. By breathing new life into a cherished piece of computing history, enthusiasts can explore the timeless appeal of vintage hardware while embracing the capabilities of modern systems. Whether for practical tasks or nostalgic indulgence, configuring your C64 as a DOS terminal is a rewarding endeavor that showcases the enduring legacy of these iconic machines. So dust off your Commodore 64, fire up your favorite terminal emulation software, and embark on a journey through the annals of computer history — one keystroke at a time.
Note: This document is the extended version of the rs232-pc.doc.txt, which was written by İlker Fıçıcılar in late 1980s ~ early 1990s.


